Introduction
Last time, I posted a solution that shows how I approached the fifth lab of MemLabs challenges. This post continues to show how I got the flags for the final lab of MemLabs, called “The Reckoning”.
Extracting the clues from description
The following is the challenge description that contains the needed clues to solve this lab.
We received this memory dump from the Intelligence Bureau Department. They say this evidence might hold some secrets of the underworld gangster David Benjamin. This memory dump was taken from one of his workers whom the FBI busted earlier this week. Your job is to go through the memory dump and see if you can figure something out. FBI also says that David communicated with his workers via the internet so that might be a good place to start.
Note: This challenge is composed of 1 flag split into 2 parts.
I managed to extract the following clue:
- FBI also says that David communicated with his workers via the internet so that might be a good place to start, is a hint to investigate browser-related activities.
Finding the image profile
First of all, we need to find the profile of the memory image using imageinfo plugin as in the following command.
CommandLine
$ ./vol -f MemoryDump_Lab6.raw imageinfo
Volatility Foundation Volatility Framework 2.6
INFO    : volatility.debug    : Determining profile based on KDBG search...
          Suggested Profile(s) : Win7SP1x64, Win7SP0x64, Win2008R2SP0x64, Win2008R2SP1x64_23418, Win2008R2SP1x64, Win7SP1x64_23418
                     AS Layer1 : WindowsAMD64PagedMemory (Kernel AS)
                     AS Layer2 : FileAddressSpace (/home/oviche/Desktop/memlabs/MemoryDump_Lab6.raw)
                      PAE type : No PAE
                           DTB : 0x187000L
                          KDBG : 0xf800027fa0a0L
          Number of Processors : 1
     Image Type (Service Pack) : 1
                KPCR for CPU 0 : 0xfffff800027fbd00L
             KUSER_SHARED_DATA : 0xfffff78000000000L
           Image date and time : 2019-08-19 14:41:58 UTC+0000
     Image local date and time : 2019-08-19 20:11:58 +0530
The first suggested profile “Win7SP1x64” worked in my case.
Reviewing the running processes
Firstly, I thought to check the running processes to find a good starting point using the pslist plugin.
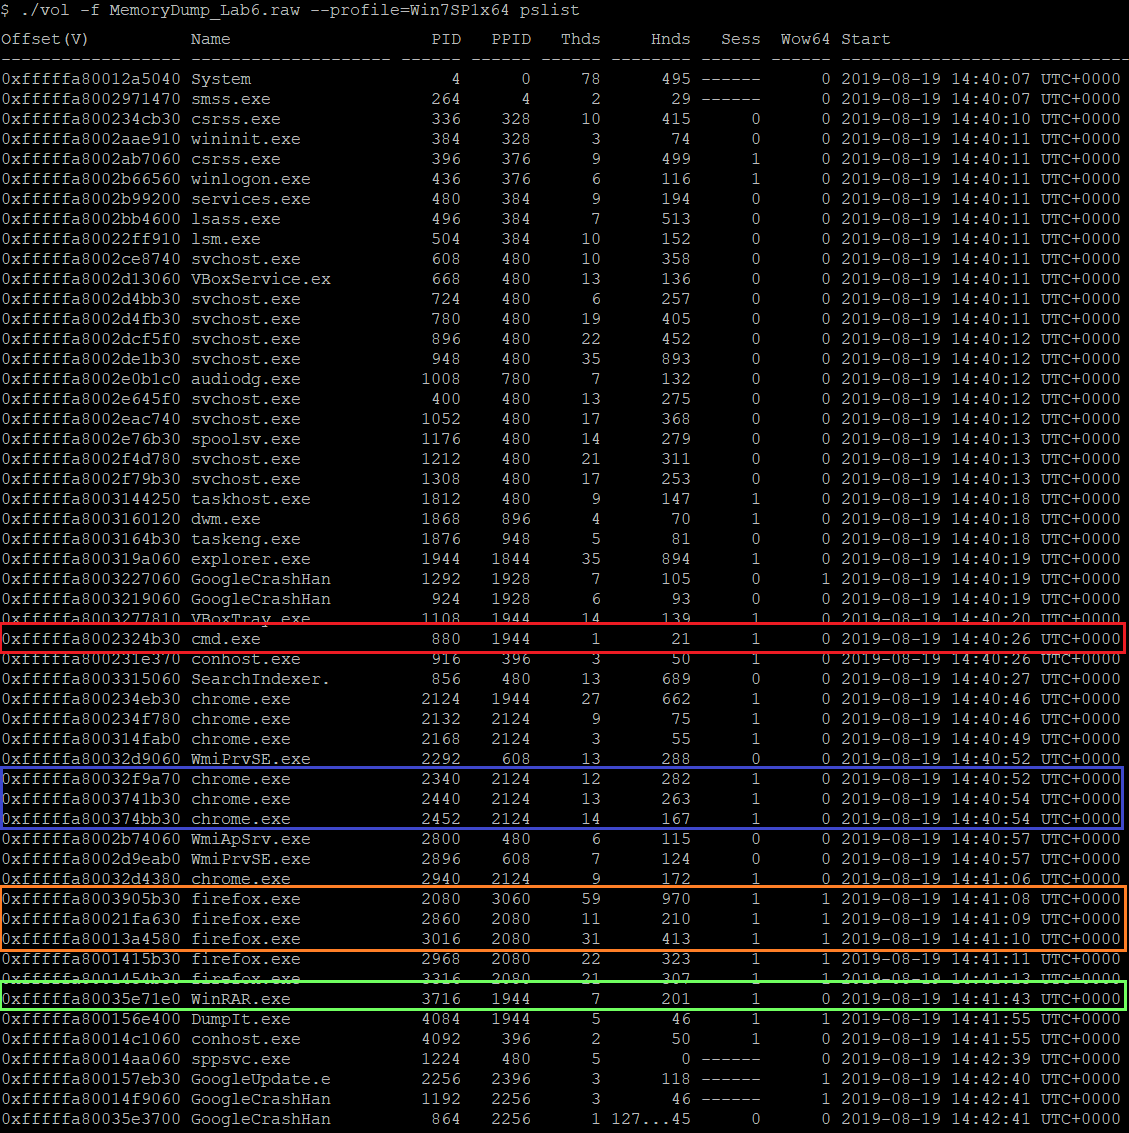 (The running processes)
As appears in the above screenshot, there are four important processes:
- cmd.exe process that indicates that some commands get executed.
- WinRAR.exe process that may be used to extract a compressed file.
- chrome.exe processes that are instances of chrome browser.
- firefox.exe processes that are instances of firefox browser.
Let’s begin with inspecting WinRAR and cmd. After that, I will examine the browser activities of Chrome and Firefox.
Inspecting WinRAR process
At this step, I will look at command line arguments for the WinRAR process using the cmdline plugin.
CommandLine
$ ./vol -f MemoryDump_Lab6.raw --profile=Win7SP1x64 cmdline -p 3716
Volatility Foundation Volatility Framework 2.6
************************************************************************
WinRAR.exe pid:   3716
Command line : "C:\Program Files\WinRAR\WinRAR.exe" "C:\Users\Jaffa\Desktop\pr0t3ct3d\flag.rar"
As appears above, the command line argument of the WinRAR process contains a flag.rar file. So, let’s dump that file using the following commands.
CommandLine
$ ./vol -f MemoryDump_Lab6.raw --profile=Win7SP1x64 filescan | grep "flag.rar"
Volatility Foundation Volatility Framework 2.6
0x000000005fcfc4b0     16      0 R--rwd \Device\HarddiskVolume2\Users\Jaffa\Desktop\pr0t3ct3d\flag.rar

$ ./vol -f MemoryDump_Lab6.raw --profile=Win7SP1x64 dumpfiles -Q 0x000000005fcfc4b0 -D DumpedFiles6
Volatility Foundation Volatility Framework 2.6
DataSectionObject 0x5fcfc4b0   None   \Device\HarddiskVolume2\Users\Jaffa\Desktop\pr0t3ct3d\flag.rar
When I tried to extract the flag.rar, I found that it’s protected by a password, as appears below.
CommandLine
$ unrar x flag.rar

UNRAR 6.11 beta 1 freeware      Copyright (c) 1993-2022 Alexander Roshal


Extracting from flag.rar

Enter password (will not be echoed) for flag2.png:
Inspecting the executed commands
As previously mentioned, one of the running processes is cmd.exe. I thought to find the executed commands using the consoles plugin.
 (The executed commands)
As appears in the above image, the unrecognized command env gets executed, which seems like a hint to check the environment variables.
Thus, let’s examine the environment variables using the “envars” plugin to find if something is interesting.
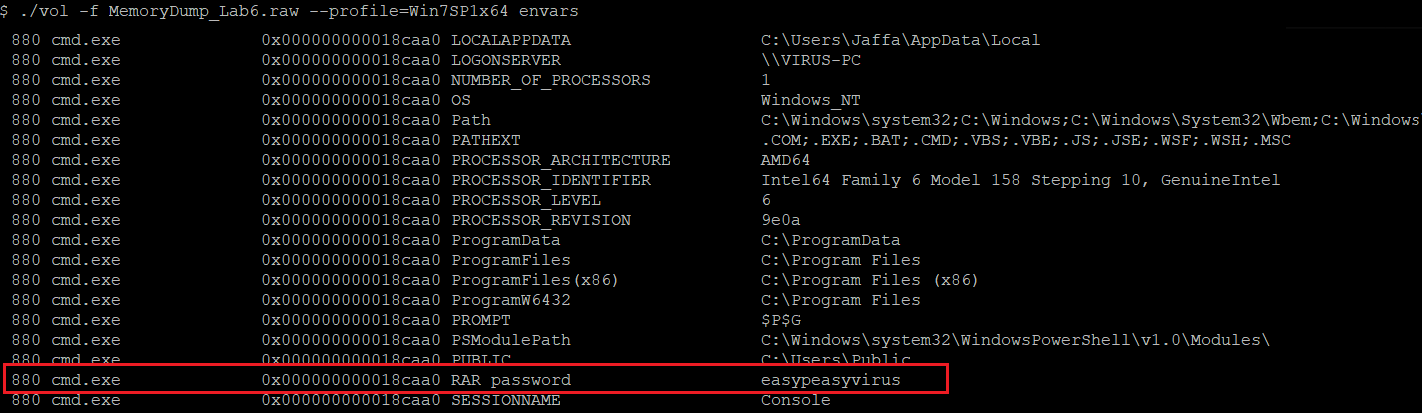 (Snippet from environment variables)
As appears above, the password easypeasyvirus for the protected flag.rar is there.
After extracting it with the password, the following image with the second part of the flag is found.
 (The second part of the flag)
Examining the browser activities
Now, let’s investigate the browsers’ activities and start with the user browsing history of the Chrome browser by dumping a file with the name History using the following commands.
CommandLine
$ ./vol -f MemoryDump_Lab6.raw --profile=Win7SP1x64 filescan | grep -i "chrome" | grep -E "*History$
Volatility Foundation Volatility Framework 2.6
0x000000005da5a610     15      1 RW-rw- \Device\HarddiskVolume2\Users\Jaffa\AppData\Local\Google\Chrome\User Data\Default\History

$ ./vol -f memlabs/MemoryDump_Lab6.raw --profile=Win7SP1x64 dumpfiles -Q 0x000000005da5a610 -D DumpedFiles6
Volatility Foundation Volatility Framework 2.6
DataSectionObject 0x5da5a610   None   \Device\HarddiskVolume2\Users\Jaffa\AppData\Local\Google\Chrome\User Data\Default\History
SharedCacheMap 0x5da5a610   None   \Device\HarddiskVolume2\Users\Jaffa\AppData\Local\Google\Chrome\User Data\Default\History
I used DB Browser for SQLite to open the dumped History file of the Chrome browser. I found there a Pastebin URL.
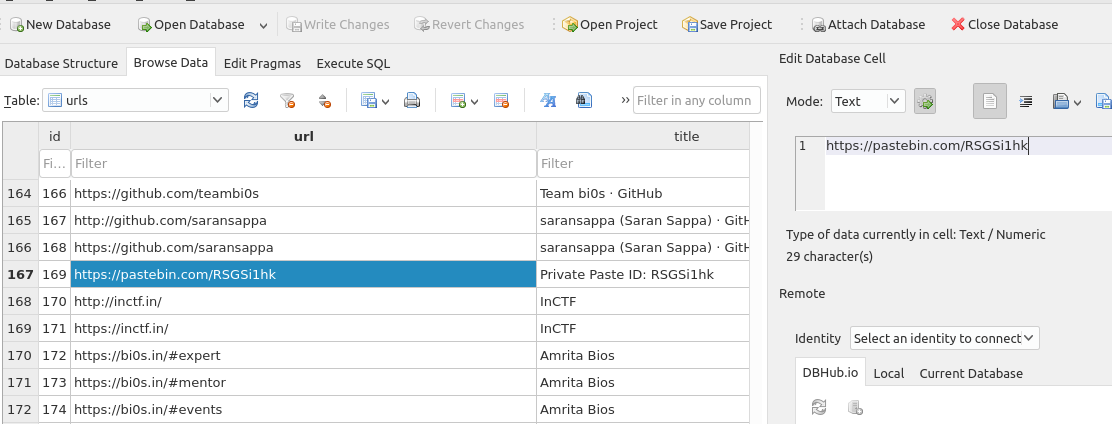 (The Pastebin URL in the Chrome history)
The Pastebin URL contains a link to a google document and text about a key that was sent through the mail as appears below.
 (The content of Pastebin URL)
After that, I visited the Google document link. This document contained much text. While going through it, I found a Mega.nz link whose content is encrypted.
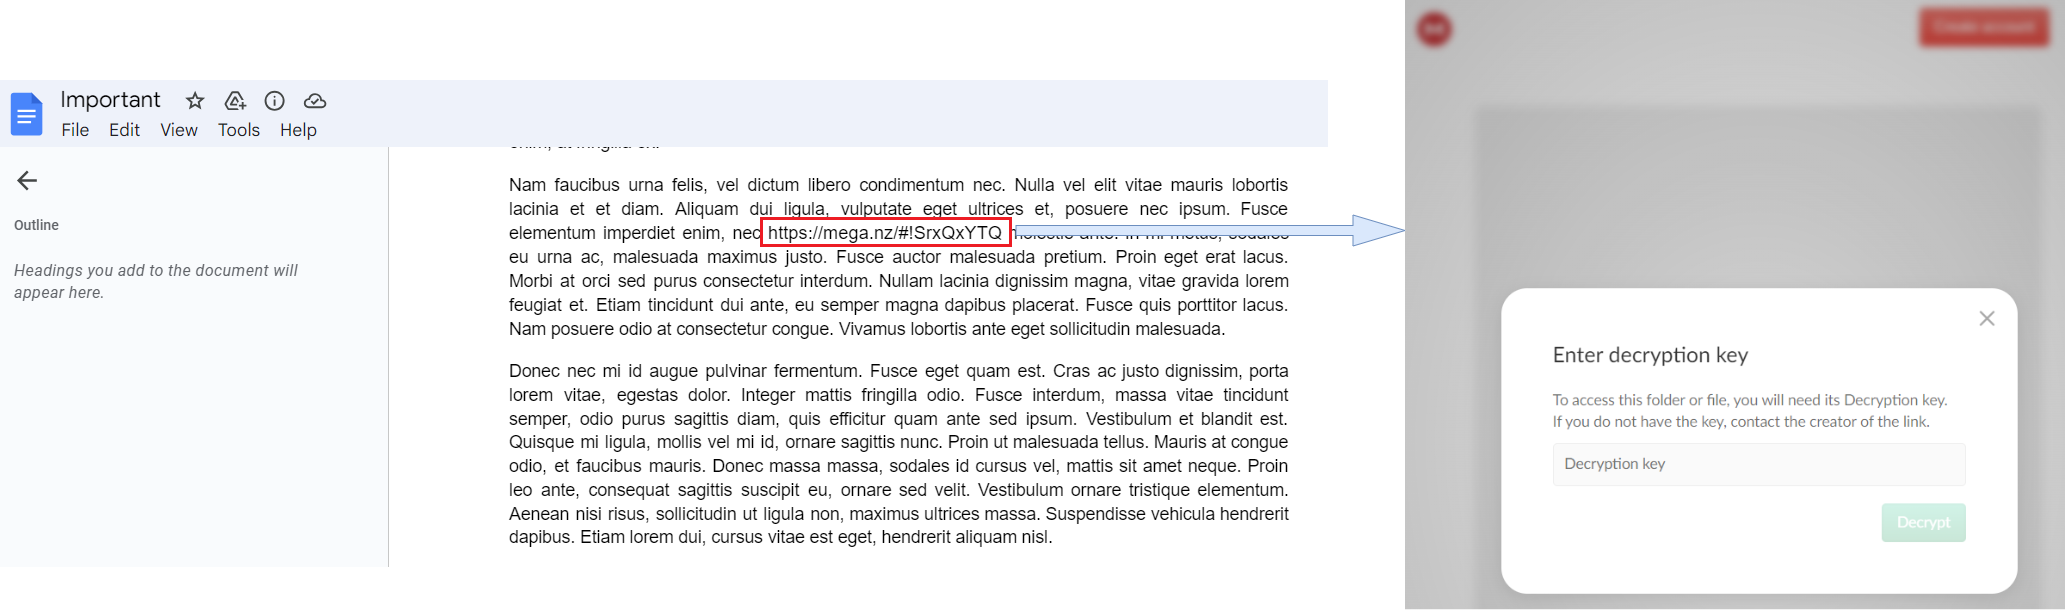 (The Mega drive link and its encrypted content)
As nothing more interesting within Chrome browser history, I shifted my attention to the Firefox browser history, which is located in a file named places.sqlite. So, let’s find and dump that file using the following commands.
CommandLine
$ ./vol -f MemoryDump_Lab6.raw --profile=Win7SP1x64 filescan | grep -E "*places.sqlite$"
Volatility Foundation Volatility Framework 2.6
0x00000000053fd070      1      1 R--rw- \Device\HarddiskVolume2\Users\Jaffa\AppData\Roaming\Mozilla\Firefox\Profiles\84kisw0a.default-release\places.sqlite
...
$ ./vol -f MemoryDump_Lab6.raw --profile=Win7SP1x64 dumpfiles -Q 0x00000000053fd070 -D DumpedFiles6
Volatility Foundation Volatility Framework 2.6
DataSectionObject 0x053fd070   None   \Device\HarddiskVolume2\Users\Jaffa\AppData\Roaming\Mozilla\Firefox\Profiles\84kisw0a.default-release\places.sqlite
SharedCacheMap 0x053fd070   None   \Device\HarddiskVolume2\Users\Jaffa\AppData\Roaming\Mozilla\Firefox\Profiles\84kisw0a.default-release\places.sqlite
While examining the Firefox history, I found two Google Mail URLs with similar titles. However, one of them contains the word “Mega Drive Key” and the other one contains random text “zyWxCjCYYSEMA-hZe552qWVXiPwa5TecODbjnsscMIU”.
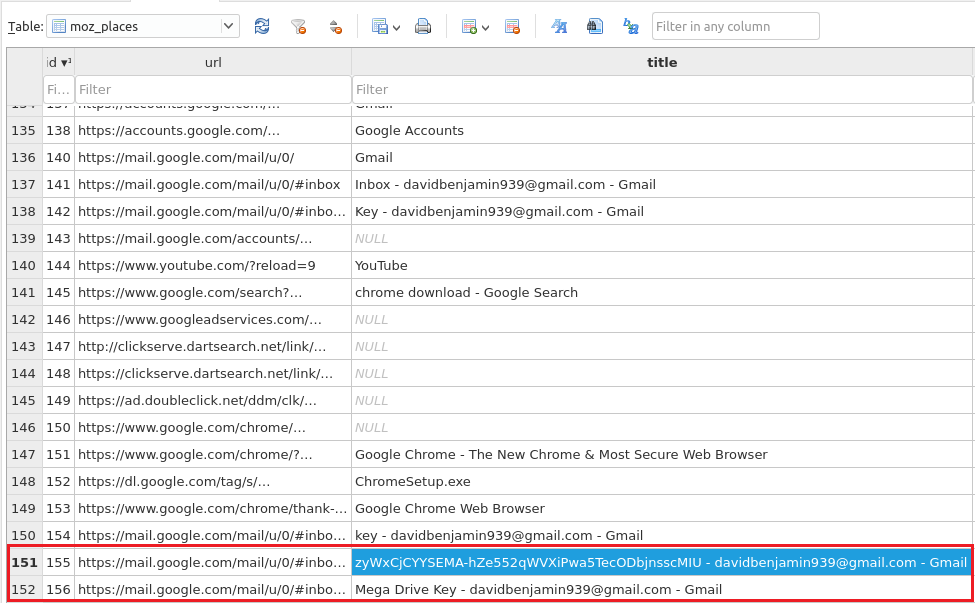 (The history for the Firefox browser)
So, I felt it’s a hint that this random text is the intended key and by trying that key, I successfully decrypt the drive content, which is flag_.png.
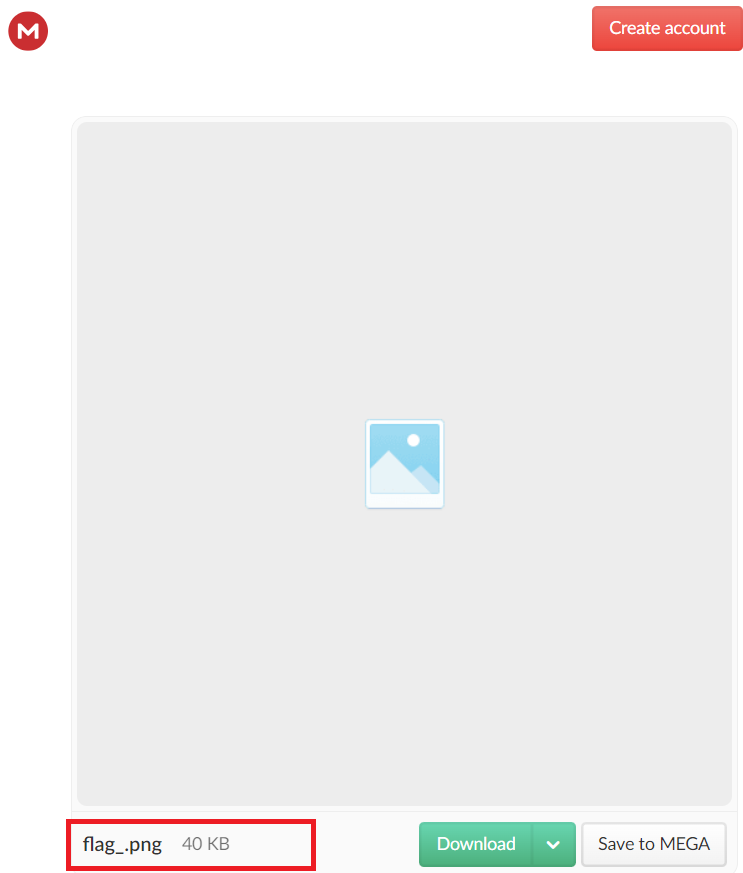 (The Mega Drive content)
When I tried to open the image, I was unable to view it because it was corrupted. So, I used online PNG file chunk inspector to compare it with the valid flag2.png(that we previously uncovered).
The first thing I noted was an error on the right side that says that the CRC-32 hash of the chunk does not match the intended one. Also, I find the intended CRC-32 hash is similar to each other. Therefore, I concluded that the chunk data in both images should be the same and by comparing data in the raw section for both, I found that there is only one byte that is not match (highlighted for both files under the “raw” section).
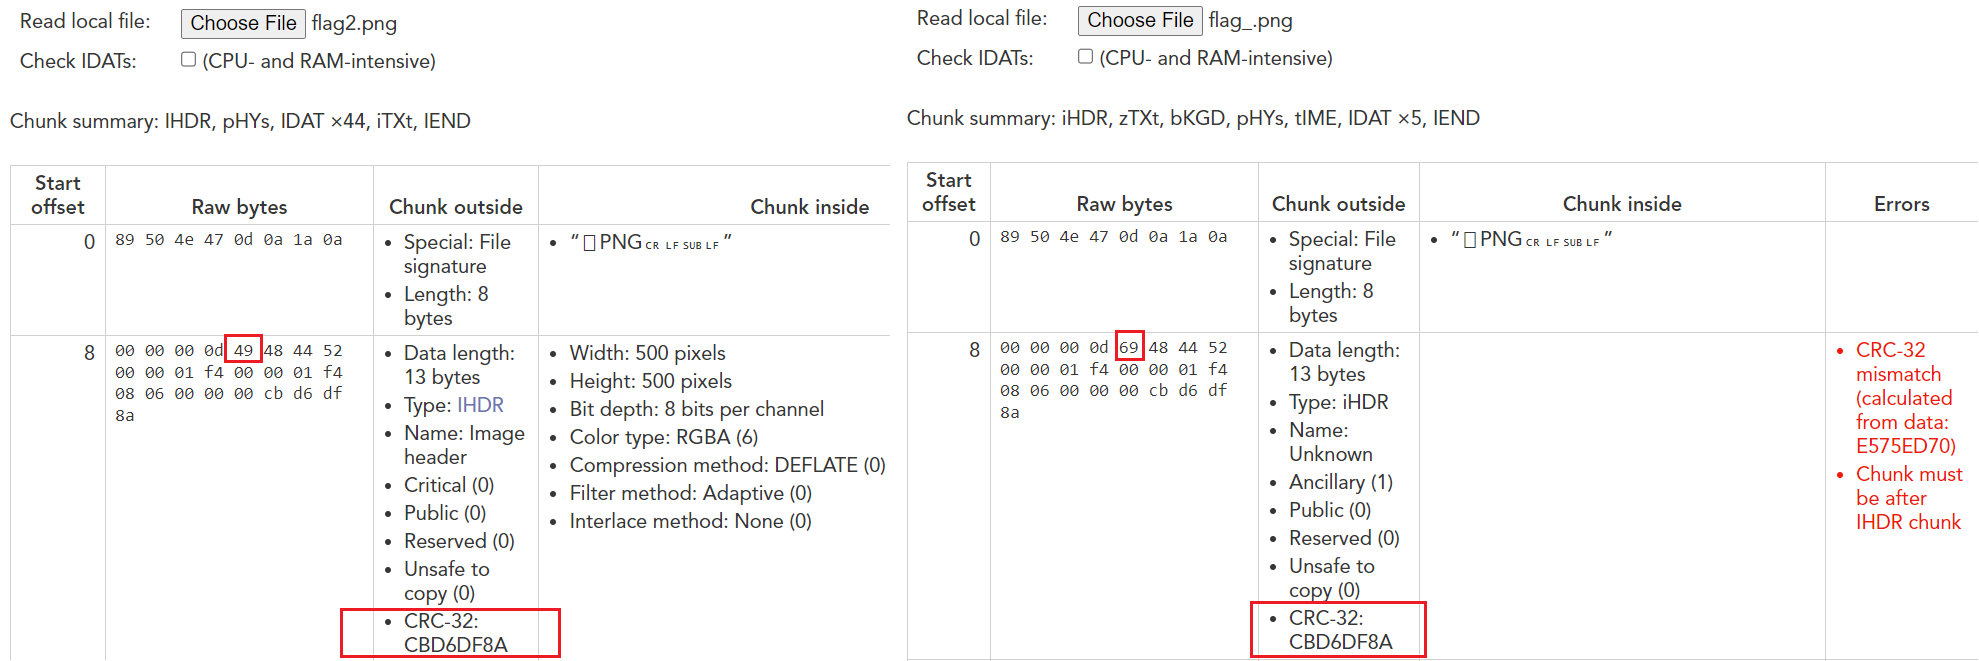 (The Chunk comparison between flag2.png and flag_.png)
After fixing value 0x69 to 0x49 using hex editor, I was able to view the flag in the file as appears below.
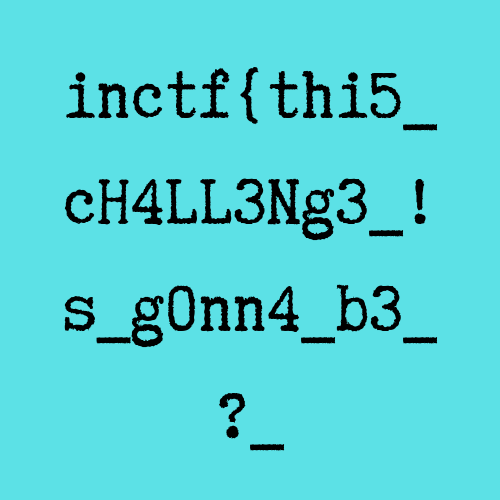 (The first part of the flag)
Conclusion
The final solution is the concatenation of the above characters of the flag as below.
inctf{thi5_cH4LL3Ng3_!s_g0nn4_b3_?_aN_Am4zINg_!_i_gU3Ss???}